How To Create Your Own Landing Page For Your Instagram Bio

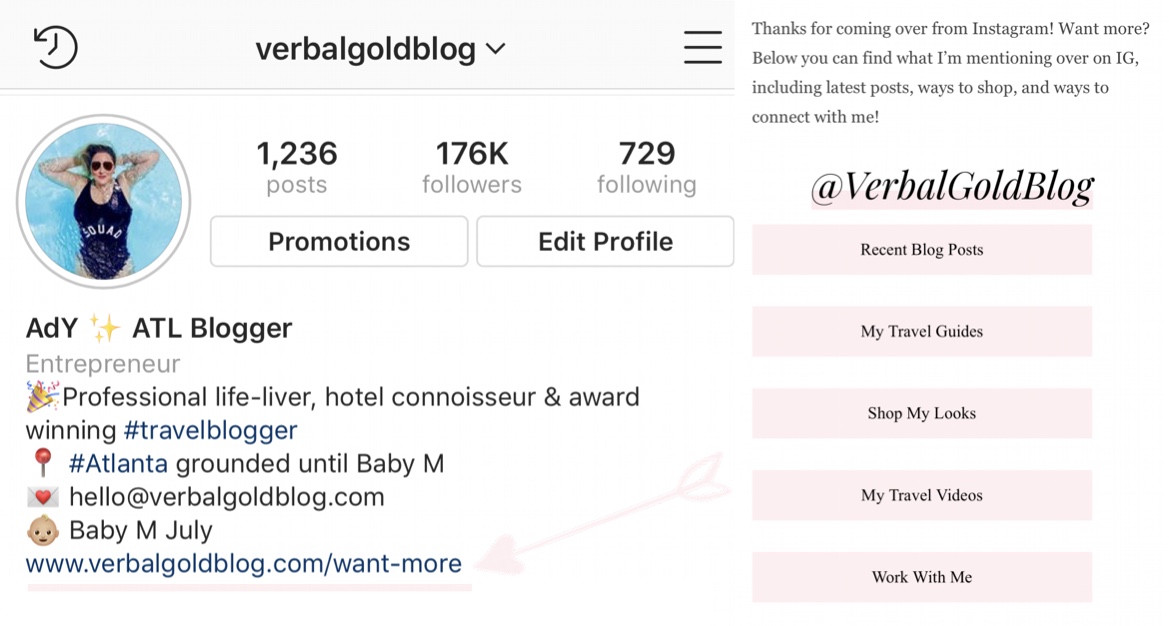
You may have noticed on Verbal Gold Blog Instagram that we have a new URL that links to a new section on the blog filled with shiny buttons. You only get ONE link on Instagram so why not make it do more by creating your own page for your Instagram bio. Think of it as a landing page to direct your Instagram traffic to your best work. These buttons link to our most requested posts, recent content, email signup, shoppable content, shortcuts to top hits, and more!
It’s an alternative to linktree (linktr.ee) or the link in bio widget but made right on our own domain. Now you can capitalize on your own website traffic and clicks. Plus, you don’t have to pay any additional subscription fees or have any fear of it going down. You’re in control!

Why use Linktree anyways? It’s not on brand, it directs people away from your website meaning more clicks to get to the same end goal, it has crashed before, and there are fees. So we made our own!
Since we’ve been getting some questions as to how we did it, we thought we’d create a step-by-step tutorial on how you can create your own block buttons using HTML on WordPress. It looks a bit complicated, but it really isn’t!
How to create your own landing page for your Instagram bio with block buttons on your website
Create your buttons using HTML
Step 1: Add a new page on your WordPress website. Once you’re in the backend of your new WordPress page. Head over to the Text editor.
Step 2: Next up, you’ll want to add this shiny HTML code to create your button(s). I’ve highlighted in light pink the parts of the code that you need to change:
<a href=”URL YOU WANT THE LINK TO GO” rel=””><button class=”blockbutton” type=”button”>TEXT THAT WILL APPEAR ON THE BUTTON</button></a>
Hit return and repeat step 2 as many times as you need until you get all your buttons and bam! You have your first buttons all neatly coded! It should end up looking something like this:

Style your button using CSS
Wait! Your buttons are done but they’re grey, dull, and look like a button from a website from the 90s!
No worries! That’s a normal step in the process – it’s the most basic look a button can get and we will make them look shiny in a second using CSS. Put into simpler words, think of the current button being naked, a CSS is a way to put some nice clothes on it!
No idea what CSS is? It stands for Cascading Style Sheets. CSS code tells HTML how elements should display. Basically, HTML is the skeleton of an element, and CSS decides what color, size, etc it should be.
Step 1: Now that we’ve cleared that up, it’s time to add some color to your buttons! You’ll want to head over to the CSS styling sheet in your website. Each theme works differently, so you’ll need to find out where that is depending on what theme you’re using. In the case of mine, all I have to do is go to Appearance > Theme settings. Once I’m there, I go to “custom code” and it brings up a field where I can add a CSS code.

Step 2: Paste this code inside the box:
.blockbutton {
width: 85%;
border: none;
background-color: #FFEFF1;
padding: 14px 28px;
font-size: 16px;
cursor: pointer;
text-align: center;
font-family: “Playfair Display”;
}
Once you hit save, all your buttons will change their size, color, font, etc. This is the exact code I’m using for my buttons, but you can get as creative as you like here!
Step 3: Play around with the code until you get the exact look you’re looking for. For instance, if you’d want your button to be baby blue instead, all you’d have to do is change the color in the code (check this website out to get color codes).
It would look like this:
.blockbutton {
width: 85%;
border: none;
background-color: #89cff0;
padding: 14px 28px;
font-size: 16px;
cursor: pointer;
text-align: center;
font-family: “Playfair Display”;
}
Result:

Or let’s say that you’d like your buttons to be white with a black border, all you’d have to do is add the same code and change/add the border inputs:
.blockbutton {
width: 85%;
border: 1px;
border-style: #solid;
border-color: #000000;
background-color: #ffffff;
padding: 14px 28px;
font-size: 16px;
cursor: pointer;
text-align: center;
font-family: “Playfair Display”;
}
Result:

Same goes with fonts, size, etc. Feel free to get creative here!
I hope you liked this tutorial on how to create your own page for your Instagram bio! Let us know if you found it useful in the comments section below.
If you’d rather just have us create your page for your Instagram bio for you, shoot us a message and we can help!